Click Here For Free Blog Backgrounds!!!
Blogaholic Designs

Pages

Sunday, October 30, 2011

Authentic Money Measurement Activity


I just opened my Sunday paper to find "The Great Big 
Toys R Us Book" flyer. Last year I did the following activity with 4th and 5th Grade classes and it was very successful.


First, I collected all my neighbors' books and then went to the local Toy R Us store to obtain more books until I had a total of one for every two students in the class. The student work with a partner on this activity, but each student purchased their own individual items. 

Each student will have $200 to spend using the Toys Are Us Catalog. They may spend less than $200.00, but they may not spend more than $200. They must purchase a minimum of 4 items.  They do not need to worry about calculating tax. 
(Though if you did this activity with 6th Grade classes calculating tax would be a good idea.)

The students will receive a “Waitress receipt form” 
to list their purchases and the accompanying prices for each item.(I bought them at Walmart for around $3.00. For some reason, using the pre-printed pad form made the activity more engaging for the students)  The students must obtain a total of all purchases at the bottom of the receipt form.  

I would suggest that you make them add the Waitress receipt form dollar amounts without a calculator.  If you need to differentiate for some students let them use the calculator.

On the back of the receipt, students are to calculate their change from the $200.00 that they were told they could spend.
 
When the students are ready to hand in their completed assignment, they are to check their work with a calculator in front of the teacher.  Any errors need to be corrected.  The teacher will write the amount of change in RED on the receipt.

As a whole class, make an “amount of change” ranking from the lowest (or closest to spending exactly $200.00) to the greatest amount of change received. (This is another opportunity to compare numbers. If you don’t have time to complete this part of the activity today, save it and as a whole group do this activity the following day.)

Deborah

Friday, October 28, 2011

Words Their Way: Ginger's and Kim's Master Schedule


This is the MASTER SCHEDULE that is used by Ginger and Kim. On the schedule. the word
"Instruction" indicates when that group is meeting with the teacher in a small guided group. Colors on the master schedule represent the color of the level of instruction and the accompanying Words Their Way book .  Tasks increase on the individual schedule sheets as the work gets harder.
CLICK HERE to obtain a copy of their master schedule.

The rest of their system is discussed in the October 27th, 2011, post titled, "Creating Independent Learner with Words Their Way"  You can obtain their checklists and grading rubric from that post.

In addition to the books shown above, our district provides the book for adapting for English Language Learners for teachers to use in their lesson planning.

Deborah's Comments:  Systems like the one used by Ginger and Kim create INDEPENDENT Learners and can be used in both multigrade and single grade level classrooms. WHY? Because it doesn't matter what grade the student is in...what matters is where they are in their learning journey and how we can differentiate the level of instruction for that individual journey.

Thursday, October 27, 2011

Creating Independent Learners with "Words their Way"

A team of 3rd grade teachers in my district, Ginger and Becky, were willing to share their system that creates independent learners when using the program “Words Their Way.”


Research shows us that taking the time to train students to be independent learners is a necessary component for a successful multigrade or single grade classroom.
Ginger acknowledged the amount of teacher effort needed to create independent learners, but “Once the students are "trained" to be independent, it is pretty amazing.”
Here are the 4 different group checklists the students use to track their individual progress, and a student rubric to assess that individual work.  I really liked how each checklist was so clear and understandable. Every student, regardless of level, knows EXACTLY what they should be doing.
Group 1, Group 2, Group 3, Group 4, Student Rubric
Deborah

Tuesday, October 25, 2011

Word Work Checklist based on the Student Rubric


What do you do to keep your students working independently so you can work with a small group of students? “I hold them accountable with a checklist that keeps track of their work and behavior,” said Lisa." They see me marking down what I see, and I share my observations with them. "

Lisa's comments remind students about their behavior or praise their effort. Those comments relate directly to the student rubric:         

·        “I’ve noticed this week that you’ve had all your materials. That’s a 4 for management of your materials this week.”

·        “Do you know that I’ve had to talk to you about your behavior 3 times this week? What score should I give you on the rubric this week?”

·        “How did you sort your words today? Tell me about it.”

Notice the different colored paper used that corresponds to the different word work levels.

Here is her slightly revised checklist. (I just had to add the bands of color for eye tracking.) The third page of the document gives you an idea of how it would be completed for an individual student.

Click on the document to download your own copy of the document.

 
 My summary of the Lisa's ideas Keep your students accountable, and make your expectations clear and achieveable.
Deborah

Sunday, October 23, 2011

Word Work Organizational Chart

Calm and focused are two words that popped into my head as I walked into Lisa's class during word work time.

It takes teacher organization and student training to achieve a class where students know what to do each day without their teacher prompting them.In addition, I saw students who knew what to do when they "finished" their required word work.

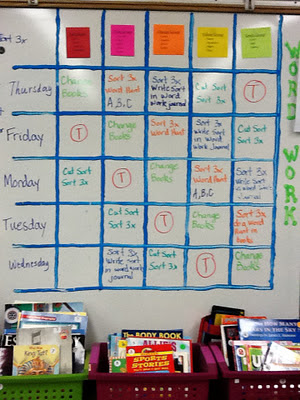
Here is the organization chart that directs students to know what their responsibility during word work is each day. The "T" on the chart indicates a small group session with the teacher. Notice that the days of the week are not in Monday- Friday order. This chart is written on the whiteboard because that gives Lisa the flexibility to change the days order based on the changing schedule, for example: holidays, teacher institute days, and parent conferences.


Lisa also has her students select their books for their independent reading bags once a week during word work time.
Coming in the next post is the checklist that Lisa uses for assessment.

Monday, October 17, 2011

"Words Their Way" Word Work Student Rubric

Our district currently uses the "Words Their Way" program.  In the next upcoming postings,  Lisa Rabe will be my guest blogger.  Just take a look at the wonderful student rubric she created so her Third Grade students clearly know what is expected from them as they work in either a teacher lead group or while working independently. I can't wait to share with you her organized system. This rubric would be appropriate in a single grade or multigrade classroom.

Would you like to have a copy of her rubric?  Click HERE for a copy.


Deborah

Sunday, October 16, 2011

Anchor Chart: What Math Skills Am I Practicing?

My last post was about taking an extra step when teaching students how to play a math game. That step is to insure that the students know what math skills they are practicing while playing the game by creating an anchor chart with them.

Kristen, from Ladybug Teacher Files, Started me thinking when she commented, “ I definitely need to do this more with my EDM games. I feel like I have to rush to get everything squeezed in and I forget to do things like that.”
How could you reduce the amount of time spent creating an anchor chart with your class?
Here is my idea:
Before teaching the lesson 

1. On sentence strips, pre-write in kid –friendly language, many of the skills the game will allow the students to practice. Code the back of the strips with a phrase to help you locate it during the upcoming class discussion.

After teaching the game
2. Write on the board: I will practice these math skills:

3. Begin a class discussion of what skills the student will be practicing as they play the game. As a student mentions an item on your prewritten strips, post them on the board.

4. Have 1 or 3 sentence strips ready for student ideas you didn’t think of during your planning.

5. Save the strips to use when they play the game again in class. Start that lesson by reviewing the skills listed on the strips.  Of course, save the strips for next year too.
 
What do you think of this idea?

. . . Deborah

Saturday, October 15, 2011

Playing Math Games

Do you take time to explain to your students why they are playing a particular math game? Or do they play the game to find out who "WINS!"


When you teach a new game, be sure to make a quick anchor chart with them so they recognize why they are using classroom instruction time to play a game.

  Actually, I wish Everyday Math would have called their games..."Skill Practice Activities" because that is why they are playing the games. That's also why you must find time in your schedule to let them practice their math skills and play the games.

When you circulate around the room as they are playing the games, you can say comments like these to connect back to the anchor chart and give them authentic and specific praise:
  • I can tell that you know the difference between a penny and a nickel.
  • How many pennies are there in a nickel?  Why do we say the word  'exchange' when you put your 5 pennies back in the pile and take out a nickel?
  • Who had more nickels in the last game? How did you know that ___ had more?
  • Good job counting those five pennies accurately.  I like how you put your finger on each one as you counted.

Tuesday, October 11, 2011

Integrating Writing into Social Studies and Science

Time is a valuable commodity in the elementary classroom.  Many teachers are being asked to integrate writing and reading instruction into Social Studies and Science. Here is an example of one way that a teacher integrated  science and writing together. The students in her class wrote an ABC book all about electricity.

 When I first saw the class book my first reaction was, “What a great way to engage students with authentic writing and the teacher will have a picture of some new ideas the students learned while studying concepts about electricity.”  Let’s look closer at some of the book together…
Q   A good Question to ask Commonwealth Edison is: How much do we have to pay every day?

R   Batteries and electricity make a Radio play

Y  When you see an electrical fire you Yell for help!

Z   When you get Zapped from  static electricity you yelp.

So................ it's cute, but could it be so much more?

What if you taught a series of lessons in reading group about paraphrasing, and then used that strategy in science when the class made their book all about electricity?

What if you named the book:
                    "Our Thoughts As We Learned About Electricity."
Individual pages could be titled:
  • A list of the most important things we learned
  • Words and their meaning that we want to remember
  • Diagrams that explain ideas that we now understand
  • Connection that we made while we learned about electricity
  • Other questions that we still have about electricity
  • Photos with captions that show us learning during our unit 
  • Experiments that helped us form new ideas
I picture a book filled with students photos with direct quotes written  next to their photo. I see student created diagrams and drawings. I would read "I wonder" statements, connections to their lives, and hopefully ... authentic writing. Lastly students from multigrade classes could work together to produce this class book. It wouldn't matter if you were a third or fourth grader.

What do you think?


Deborah


Monday, October 10, 2011

100 Number Grid Game Multi-sized


My size 7 1/2  shoe gives you an idea of the size of each individual number grid rectangle.

Using this 54 inch by 84 inch 100's Grid enabled the children in a 1/2 Multigrade Bilingual Classroom to have  so much FUN    a rich educational experience while learning how to navigate and understand the 100's grid chart.

Examples of activities we did together.
First, I made sure everyone could navigate around the 100's chart. Everyone took off their shoes and did this activity in their socks (giggle, giggle). Everyone in the class walks on the 100's chart the same way that our eyes travel as we read the 100's chart from 1 to 100. 1, 2, 3, 4, 5, 6, 7, 8, 9, 10, and then all the way back quickly to 11. We continue to walk just like our eyes do all the way to 100.


The class then sat around the chart with their own personal 100's chart to follow along with their finger.  I told the class I only choose students to walk on the mat if I see  them participating 100 % !
So one child is chosen to:

  • stand on the number 35, add one more, add one more, add one more...you are now on 38. The class was asked,"What happens when you move to the right on the hundreds chart? YOU ADD ONE MORE TO THE NUMBER YOU ARE STANDING ON.
  • (next child) stand on the number 35, one less, one less, one less, one less...you are now on 31. The class was asked "What happens when you move to the left on the hundreds chart? YOU SUBTRACT ONE FROM THE NUMBER YOU ARE STANDING ON.
  • (next child) stand on the number 35, step down one row, step down one row,...you are now on 55.  The class was asked "What happens when you move down one row?  YOU ADD 10 MORE TO THE NUMBER YOU ARE STANDING ON.
  • (next child) stand on the number 35, step up or backwords one row, one row, one row...you are now on 5. The class was asked "What happens when you move one row up? YOU SUBTRACT 10 FROM THE NUMBER YOU ARE STANDING ON, OR END UP WITH 10 LESS.

  • (next child) In order, the children sitting around the chart give a command to the child standing on the chart, "One less, One less, One more, ten more, three more, ten less.... "

  • Next, I tell them we will be playing a game that let's them practice using the 100's Chart. It is the Everyday Math Game, "Juego de la cuadricula de numeros" which translates into "Game of the grid of numbers". Perhaps you will recognize the Everyday Math Game called the "Number Grid Game"


Basicly the game is played like this:

Materials
1 Hundreds Chart
1 die for the First Graders, or 2 dice for the Second Graders
a game marker for each player
Number of  Players
two or more players
Directions
Players place their markers at ONE on the number grid. Player A rolls the die and moves 10 spaces if a "1" is thrown, 20 if a "2" is thrown, and the face-value number of spaces for all other throws.
Player B follows in turn.
Winner
Play ends when one player gets to 100 or beyond


 Deborah

Thursday, October 6, 2011


What a nice surprise!

Thanks to “Finding Joy in 6th Grade” for extending this award to me.  I especially enjoy this award because of the meaning of the word- versatile. I was also touched by her comment, “I am re-thinking teaching decimals thanks to this great site! Great math ideas abound!” 

Speaking of word meanings…Have you ever needed a kid friendly definition of a word, and struggled to create that definition? I was part of a team writing lessons to accompany Making Meaning lessons using alternative texts for our Multi-grade classrooms in our district, and I needed to create kid friendly definitions to define text vocabulary. A great online dictionary that helped me and   can help you too is called the Longman Dictionary of Contemporary English online. 

How to use the LONGMAN DICTIONARY OF CONTEMPORARY ENGLISH ONLINE www.ldoceonline.com  
It is so easy to use

STEP 1 - Just type your word into the search box and click OK.

 For example: versatile

STEP 2 - That's it! The definition will appear in the window.

ver‧sa‧tile

1someone who is versatile has many different skills:

a very versatile performer

a more versatile workforce

2having many different uses:

The potato is an extremely versatile vegetable.

—versatility noun [uncountable]

*     Hegley's outstanding versatility as an all-round entertainer.
 Deborah, alias the "Versatile Math Gal"

Tuesday, October 4, 2011

Illustrations for Meter Stick

Reading a Meter Stick Illustrations
that could go on a word wall
 on top of a student's desk during the study of metric measuring
 on a flashcard
 or used as a visual during your lesson about reading a meter stick

 CLICK HERE For Your Copy


Deborah

Monday, October 3, 2011

Meter Stick: What do All Those Lines Mean?

Ever wonder if your students even understand a metric stick or not? Don’t just teach your students how to use a meter stick…create a meter ruler together and help them really understand the base 10 system behind it.

(I wish I could show you the students expressions on their faces...they were so involved in the activity!)

1.      Discussion
           First, make a connection between what students already know (the yardstick) and the meter ruler.  Do this by presenting a concrete model of both measuring tools- the yardstick and the meter stick. Your students should notice that the meter ruler is longer in length than the yardstick.  One meter is about 39.37 inches or “About 39 ½ inches.” Cut out a model of a large rectangle 100 inches long. I use vinyl felt-backed tablecloth material from Hancock Fabric, but roll paper could be used too.

2.      Discuss the fact that the metric ruler is based on multiples of ten. As a whole group, count orally by tens to 100. The meter will be divided into ten “decimeters” (tenths of a meter) and can be seen on the meter ruler as 10, 20, 30,40,50,60,70,80,90 and 100 centimeters. Cut out 10 equal sections 10 inches long that will represent the decimeters from "foam sheets". Determine a point a short length in from the end of the vinyl ruler and label it “0”. Lay the foam sections on the large vinyl ruler.  Please take time discussing the fact that each standard unit is the same size.  You can make 2 smaller sections ( 5" and 7" )and use them initially to show the students that varying sized units cannot be used. Hopefully one student will notice that the segments are not all the same length.) Write the word decimeter on the first foam decimeter section.

3.      Each of those sections will be divided into ten equal size “centimeters” (Hundredths of a meter). The centimeters will be counted from 1 to 100. Use 1 inch color tiles and have your students lay them on the edge of the vinyl ruler to represent the 100 centimeters. On the first provided section, actually draw the centimeters tic marks on the foam decimeter section. Label the numbers 10, 20, 30, 40…100 on the appropriate one inch tiles.
4.      Next, divide each centimeter into 10 millimeters.  Discuss the connection that there are 1000 millimeters in one meter or 100 centimeters times 10= 1000. 

      Have a student select a point on the ruler and determine the measurement. For example, 43 millimeters is found by counting the centimeters...4 which stands for 40 millimeters and then counting the millimeters beyond the 4 centimeters…3 more millimeters.

5.      Summarize the presentation by asking several children to state one idea about the meter ruler that was discussed today. 
6.      Application:  Now let the students practice the skill by measuring objects or drawing lines of certain length either individually or with a partner.
Common Core Standard Connection
2nd Grade
Measure and estimate lengths in standard units.
2.MD.1. Measure the length of an object by selecting and using appropriate tools such as rulers, yardsticks, meter sticks, and measuring tapes.
2.MD.2. Measure the length of an object twice, using length units of different lengths for the two measurements; describe how the two measurements relate to the size of the unit chosen.
2.MD.3. Estimate lengths using units of inches, feet, centimeters, and meters.
2.MD.4. Measure to determine how much longer one object is than another, expressing the length difference in terms of a standard length unit.
4th Grade

4.MD.1. Know relative sizes of measurement units within one system of units including km, m, cm; kg, g; lb, oz.; l, ml; hr, min, sec. Within a single system of measurement, express measurements in a larger unit in terms of a smaller unit. Record measurement equivalents in a two-column table. For example, know that 1 ft is 12 times as long as 1 in. Express the length of a 4 ft snake as 48 in. Generate a conversion table for feet and inches listing the number pairs (1, 12), (2, 24), (3, 36), ...
Deborah

Saturday, October 1, 2011

Making Math Real and Personal

Recently I visited a 3rd Grade classroom and asked the students to draw a model that showed 1 square inch and 1 square centimeter on their whiteboards. I found that they had no personal visual references in their mind of how much space those measurements covered and had no confidence in their own drawings. So how do you make it real and personal?

The 3rd Grade Common Core Standard states: 

"Geometric measurement: understand concepts of area and relate area to multiplication and to addition.

  • 3.MD.5. Recognize area as an attribute of plane figures and understand concepts of area measurement.
    • A square with side length 1 unit, called “a unit square,” is said to have “one square unit” of area, and can be used to measure area.
    • A plane figure which can be covered without gaps or overlaps by n unit squares is said to have an area of n square units.
  • 3.MD.6. Measure areas by counting unit squares (square cm, square m, square in, square ft, and improvised units)."

Can your students visualize how much space is covered by a particular square unit?  Do they have an internal sense of how much space is covered by a square inch or a square centimeter?

   I want to show you a set of models that I created to assist students in visualizing square units.

First, I went to a hardware store and bought 4 vinyl tiles that measured 12 inches by 12 inches.
This represents the space covered by 1 SQUARE FOOT.

Next, I created a grid of 1 inch by 1 inch square unitson the second tile. In one square foot, there are 144 square units.

Let's not forget about square centimeters. Look how many square centimeters cover one square foot!!

We never talk much about square decimeters, so I made a model of those square units too. There are a bit more than 9 square decimeters in one square foot. 


First, I showed the students  the back of the tile.The students predicted, by writing down a number on their white board,  how many square units would fit in the space of one tile. Then I turned it around to verify how well they had predicted. By having them "wonder or predict" first, it became personal.

 When I turned the tile around to show the square centimeters, one child exclaimed, "Wow, there are a lot of those buggers...more that I thought there would be!"

 Then we discussed a reference we could remember about how large different square units are and the students and I decided that the size of one square centimeter is about the size of the top of your finger.


One square inch is about the size of a quarter.

Lastly, that our school is covered in square feet and all you have to do to remember is to look down at the floor.


We often ask a student whether or not their answer makes sense. Hopefully when they respond that the area of their math book is 19 sq. cm. they will dig into their personal references and think...that just can't be right...let me try again.

Deborah


Related Posts Plugin for WordPress, Blogger...